# 工作清单开发文档
# 目录
[toc]
# *.更新日志
| 版本 | 内容 | 时间 |
|---|---|---|
| 0.9 | 完成了大体内容与主要功能 | 2021-07-03 |
| 0.95 | 初步完成移动端适配、回车键的交互效果、同时调整了部分变量名,使其更加统一。调整了界面和按钮的布局 | 2021-07-04 |
| bug修复 | 修复了移动端输入框中看不到所输入的文本的bug | 2021-07-08 |
| bug修复 | 添加子事项回车键无法使用的bug | 2021-07-08 |
| 代码优化 | 使用数组方法 splice() 完成对数组的操作 | 2021-07-08 |
| 功能优化 | str.trim() | 2021-07-08 |
| bug修复 | 删除分类、事项之后,对后续分类、事项、子事项进行操作时,出现目标错误的情况,由删除之后未重新定位序号导致的 | 2021-07-14 |
# 待完成事项:
- 删除按钮的二次确认
- 交互的提示
- 使用解构赋值优化代码
# Issue
移动端输入框看不到所输入的文本进一步测试,浅色主题下,可以看到输入框的文本正常初步判断是因为深色主题下,文本颜色为白色导致输入框看不到所输入的颜色- 已大体解决
代码,通过使用 const xxx = this.$store.state.xxxx,然后再进行修改,让代码可读性提高的可行性?部分移动端的按钮图标、渐变文字会丢失框架官方bug……
输入框输入空格便可以完成输入的问题(到底允不允许这种情况?)- str.trim()
添加子事项使用回车键无法正常添加的异常:“this.createMatterSon is not a function”- 已解决
关于数组方法的修改——原方法过于累赘,可以直接使用 splice()- 关于移动端至今为止的各种情况
- 渐变字体无法正常展示渐变色(华为浏览器)
- 按钮图标丢失(小米、safari)
- 输入框背景色为白色(华为)
事项修改优先级——Cannot read property 'matters' of undefined当删除了分类、事项的时候后续的分类、事项、子事项的ID需要进行修改- 已解决
- 当同时打开两个及以上该页面时,在其中一个页面进行待办事项的修改之后,另外一个页面再进行修改是否会出现bug?
- 预测:因为是中间经过了vuex之后再同步到本地上的,所以可能会出现互相覆盖的现象。
- 测试结果:会互相覆盖。
# 0.前言
我原本想要写点什么东西……
# 1.系统规格说明
# 1.1:系统功能和目标
toDoList——一个能够记录更多细节和更清晰更详细内容的待办事项列表
# 1.2:主要功能
| 功能 | 描述 | 备注 |
|---|---|---|
| 登录/注册 | 用户可以登录/注册账号 | 暂不具备实际作用 |
| 新建分类 | 用户可以根据自己的习惯新建一个分类 | |
| 新建事项 | 用户可以在分类下新建一个事项 | |
| 新建子事项 | 用户可以在一个事项下新建子事项,用于对事项的详细描述、规划 | |
| 修改事项 | 用户可以修改事项的内容(包括子事项) | |
| 完成事项 | 用户可以勾选事项表示事项已经完成(包括子事项) | |
| 删除事项 | 用户可以删除不需要的事项 | |
| 云同步 | 用户可以根据账号信息同步事项列表 | 暂不具备实际作用 |
# 2.总体设计
# 2.1:系统输入
- 新建分类信息
- 新建事项信息
- 新建子事项信息
- 修改事项信息
- 完成事项请求
- 删除事项请求
- 用户注册信息
- 用户登录信息
- 云同步请求
# 2.2:系统输出
- 事项列表
- 用户信息
# 3.概要设计
# 3.1:操作流程
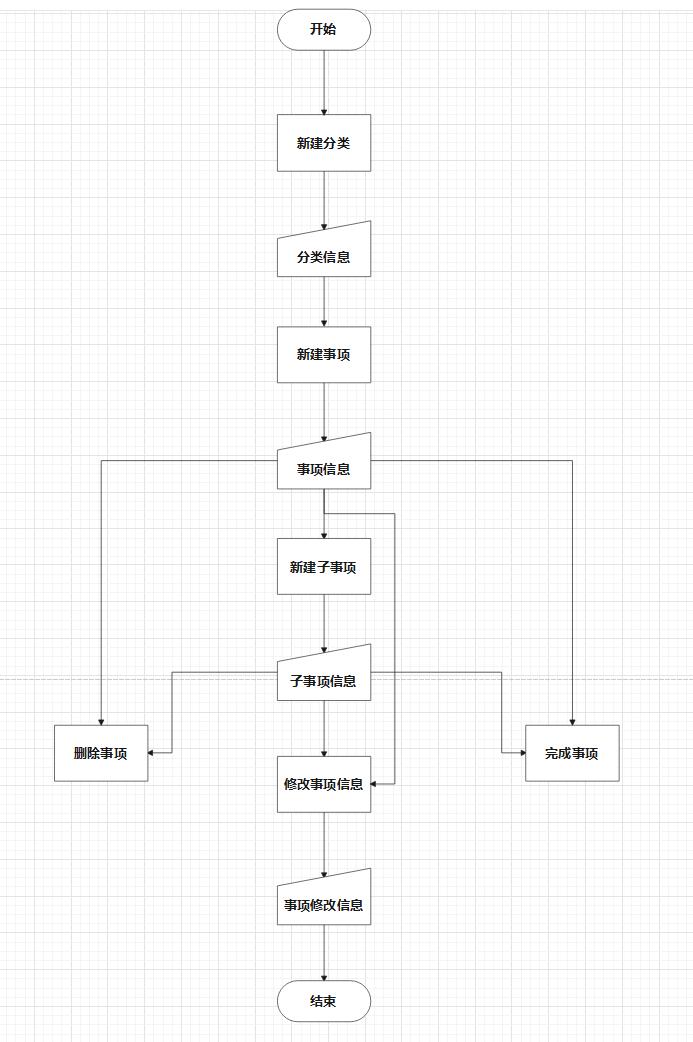
# 3.2:用例图

# 4.数据库设计
# 4.1 E-R图
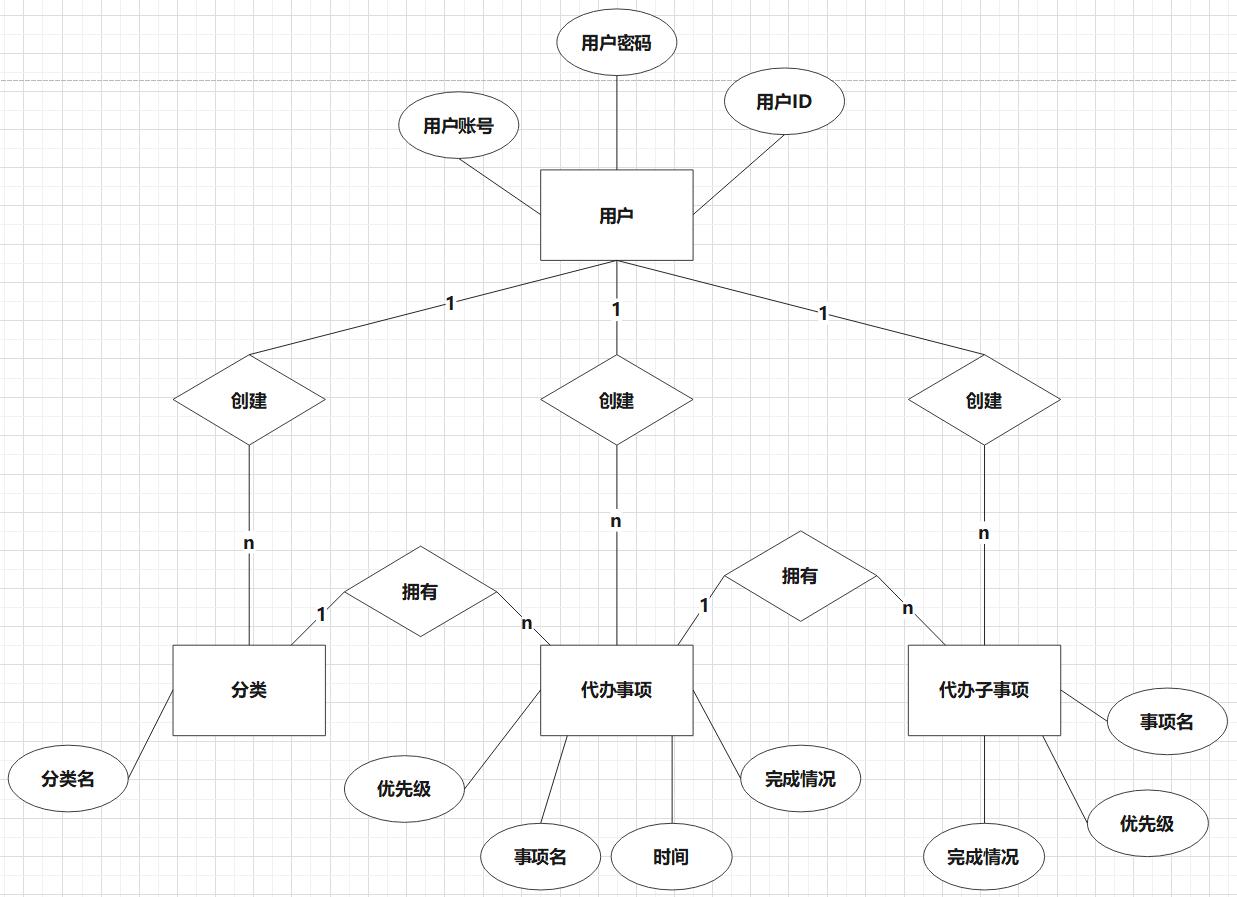
# 4.2 用户基础信息关系模式定义——userInfo
| 字段名称 | 字段代码 | 字段类型 | 数据约束 |
|---|---|---|---|
| 用户账号 | account | Varchar(6,16) | 主键 |
| 用户密码 | password | Varchar(6,18) | Not Null |
| 用户ID | userID | Int | 外键 |
# 4.3 代办事项列表关系模式定义——matterList
| 字段名称 | 字段代码 | 字段类型 | 数据约束 |
|---|---|---|---|
| 用户ID | userID | Int | 主键 |
| 分类 | classification | Null |
# 4.4 分类关系模式定义——classification
| 字段名称 | 字段代码 | 字段类型 | 数据约束 |
|---|---|---|---|
| 分类名 | label | Varchar(1,20) | Not Null |
| 代办事项 | matters | Null |
# 4.5 代办事项关系模式定义——matters
| 字段名称 | 字段代码 | 字段类型 | 数据约束 |
|---|---|---|---|
| 事项名 | label | Varchar(1,20) | Not Null |
| 事项描述 | describe | Varchar(100) | Null |
| 创建时间 | createTime | Datetime | Not Null |
| 拟完成时间 | completionTime | Datetime | Null |
| 优先级 | priority | Int | Null |
| 完成情况 | completion | Bit | Not Null |
| 代办子事项 | matter-sons |
# 4.6 代办子事项关系模式定义——matter-sons
| 字段名称 | 字段代码 | 字段类型 | 数据约束 |
|---|---|---|---|
| 事项名 | label | Varchar(1,20) | Not Null |
| 事项描述 | describle | Varchar(100) | Null |
| 创建时间 | createTime | Datetime | Not Null |
| 拟完成时间 | completionTime | Datetime | Null |
| 优先级 | priority | Int | Null |
| 完成情况 | completion | Bit | Not Null |
# 4.7 数据结构设计
user = {
	account: '',
	password: '',
	userID: 0,
	mattersLists: {}
}

mattersList = {
    classifications: []
}

classification = {
    label: '',
    matters: []
}

matter = {
	label: '',
	describe: '',
	createTime: '',
	completionTime: '',
	priority: 0,
	completion: false,
	matter-sons: []
}

matter_son = {
	label: '',
	describe: '',
	createTime: '',
	completionTime: '',
	priority: 0,
	completion: false
}
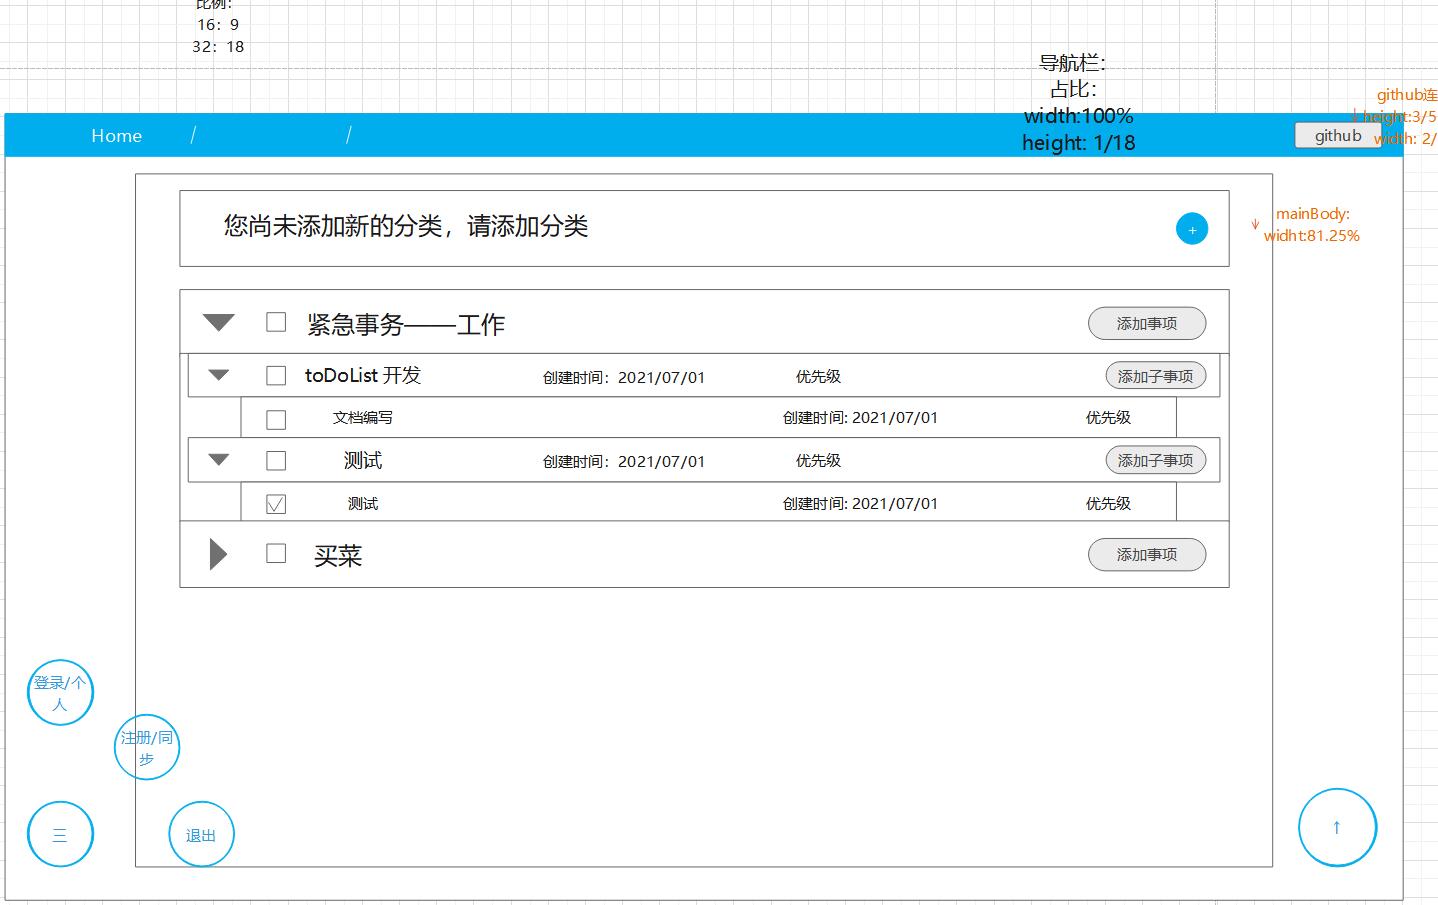
# 5.页面设计
简单线框图(因为工具的问题,暂不进行细化)
# 6.编程实现
# 6.1 项目创建与依赖导入
使用vue.js技术,vue版本为 3.0.0, @Vue/cli 版本为 4.5.13
使用naive-ui框架——主要是对naive-ui的一次尝试
naive-ui 官网:https://www.naiveui.com/zh-CN/light (opens new window)
同时使用 vuex,以支持数据的存储。
提示
⚠️ 因为暂不打算开发后端,所以所有的数据都是以本地缓存的方式进行存储
提示
vuex的版本是4.0.2
且在vue2与vue3中,vuex的使用方式不同
// vue3 store/index.js
import { createStore } from 'vuex'
# 6.2 全局数据准备 (版本:0.9)
鉴于暂不搭建后端的缘故、所以登录相关的操作暂不考虑,而相关数据也以本地存储的方式(localStorage)进行。
为了让数据更加便于获取与更新,这里使用vuex进行数据的存储
export default createStore({
	state: {
		mattersList: {
			classifications: []
		}
	},
	mutations: {
		// 获取事项列表
		getMattersList(state, List) {
			state.mattersList = List
		},
		//============================================//
		// 分类相关——增删改
		// 添加新的分类
		pushClassification(state, classification) {
			state.mattersList.classifications.push(classification)
		},
		// 移除分类
		removeClassification(state, classIndex) {
			state.mattersList.classifications.splice(classIndex, 1)
		},
		// 修改分类名
		editClassification(state, editClassForm) {
			let label = editClassForm.label
			let index = editClassForm.index
			state.mattersList.classifications[index].label = label
		},
		// 分类相关操作到此截至

		//===============================================//
		// 待办事项相关——增删改
		// 增加新的待办事项
		pushMatter(state, pushMatterForm) {
			// classIndex, matter
			let classIndex = pushMatterForm.classIndex
			let matter = pushMatterForm
			state.mattersList.classifications[classIndex].matters.push(matter)
		},
		// 删除待办事项
		removeMatter(state, removeMatterForm) {
			// classIndex, matterIndex
			let classIndex = removeMatterForm.classIndex
			let matterIndex = removeMatterForm
			const matters = state.mattersList.classifications[classIndex].matters
			matters.splice(matterIndex, 1)
		},
		// 修改待办事例
		editMatter(state, editMatterForm) {
			// classIndex, matterIndex, matter
			let classIndex = editMatterForm.classIndex
			let matterIndex = editMatterForm.matterIndex
			// 获取所修改的待办事项
			const matter = state.mattersList.classifications[classIndex].matters[matterIndex]
			matter.label = editMatterForm.label
			matter.describe = editMatterForm.describe
			matter.completionTime = editMatterForm.completionTime
			matter.priority = editMatterForm.priority
		},
		// 待办事例完成情况修改
		complateMatter(state, form) {
			let classIndex = form.classIndex
			let matterIndex = form.matterIndex
			// 获取所修改的待办事项
			const matter = state.mattersList.classifications[classIndex].matters[matterIndex]
			if (matter.completion) {
				matter.completion = false
			} else {
				matter.completion = true
			}
		},

		// 待办事项相关操作到此截至

		//==================================================//
		// 待办子事项相关——增删改
		// 增加新的待办子事项
		pushMatterSon(state, pushMatterSonForm) {
			// classIndex, matterIndex, matterSon
			let classIndex = pushMatterSonForm.classIndex
			let matterIndex = pushMatterSonForm.matterIndex
			let matterSon = pushMatterSonForm
			state.mattersList.classifications[classIndex].matters[matterIndex].matterSons.push(matterSon)
		},
		// 删除待办子事项
		removeMatterSon(state, removeMatterSonForm) {
			// classIndex, matterIndex, matterSonIndex
			let classIndex = removeMatterSonForm.classIndex
			let matterIndex = removeMatterSonForm.matterIndex
			let matterSonIndex = removeMatterSonForm.matterSonIndex
			// 获取所删除的子事项所在的子事项组
			const matterSons = state.mattersList.classifications[classIndex].matters[matterIndex].matterSons
			matterSons.splice(matterSonIndex, 1)
		},
		// 修改待办子事项
		editMatterSon(state, editMatterSonForm) {
			// classIndex, matterIndex, matterSonIndex, matterSon
			let classIndex = editMatterSonForm.classIndex
			let matterIndex = editMatterSonForm.matterIndex
			let matterSonIndex = editMatterSonForm.matterSonIndex
			// 获取到当前修改的子事项
			const matterSon = state.mattersList.classifications[classIndex].matters[matterIndex].matterSons[
				matterSonIndex]
			matterSon.label = editMatterSonForm.label
			matterSon.describe = editMatterSonForm.describe
			matterSon.completionTime = editMatterSonForm.completionTime
			matterSon.priority = editMatterSonForm.priority
		},
		// 子事项完成情况修改
		complateMatterSon(state, form) {
			let classIndex = form.classIndex
			let matterIndex = form.matterIndex
			let matterSonIndex = form.matterSonIndex
			// 获取到当前修改的子事项
			const matterSon = state.mattersList.classifications[classIndex].matters[matterIndex].matterSons[
				matterSonIndex]
			if (matterSon.completion) {
				matterSon.completion = false
			} else {
				matterSon.completion = true
			}
		}
	}
})
同时,我们也可以准备以下类,以便于添加数据。
// 分类
export class Classification {
	constructor(label) {
		this.label = label
		this.matters = []
	}
}

// 待办事项
export class Matter {
	constructor(classIndex, label, describe, createTime, completionTime, priority) {
		this.classIndex = classIndex
		this.label = label
		this.describe = describe
		this.createTime = createTime
		this.completionTime = completionTime
		this.priority = priority
		this.completion = false
		this.matterSons = []
	}
}
// 代办子事项
export class matterSon {
	constructor(classIndex, matterIndex, label, describe, createTime, completionTime, priority) {
		this.classIndex = classIndex
		this.matterIndex = matterIndex
		this.label = label
		this.describe = describe
		this.createTime = createTime
		this.completionTime = completionTime
		this.priority = priority
		this.completion = false
	}
}
测试是否能够创建类的实例对象
classtest () {
	let classification = new Classfication('试试');
	console.log(classification);
}
# 6.3 主题 (版本:0.9)
为了使用 naive-ui提供的主题样式,所以需要配置naive-ui的主题
<!-- App.vue -->
<template>
	<n-config-provider :theme="themeData" :locale="zhCN" :date-locale="dateZhCN">
    	<n-space vertical>
    		<n-button>naive-ui</n-button>
             <n-button type="success" @click="themetest()">主题切换测试</n-button>
    	</n-space>
    </n-config-provider>
</template>

<script>
import { defineComponent } from 'vue'
import { NConfigProvider, darkTheme, zhCN, dateZhCN} from 'naive-ui'
import { NSpace, NButton } from 'naive-ui'
export default defineComponent({
    name: 'App',
    components: {
        NConfigProvider,
        NSpace,
        NButton
    },
    setup () {
        return {
            darkTheme,
            zhCN,
            dateZhCN
        }
    },
    data () {
        return {
            // 用于保存主题,以实现主题切换
            themeData: darkTheme
        }
    },
    methods: {
        // 用来测试主题切换的事件
        themetest () {
            // n-config-provider 的 theme属性,如果为undefined,则为naive-ui的默认主题——亮色,不过在这里我默认的主题是暗色
            // 如果为darkTheme 则为暗色
            this.themeData = this.themeData === undefined?this.darkTheme:undefined
        }
    }
})
</script>
反复点击按钮,看看按钮的样式是否会改变?
因为打算切换主题,所以我们需要给背景添加样式
body {
  background: black;
  transition: all 1s;
  color: white;
}
同时在主题切换的按钮点击触发事件中,也要添加对背景颜色的修改
themetest () {
	this.themeData = this.themeData === undefined ? this.darkTheme : undefined
document.querySelector('body').style.background = document.querySelector('body').style
	.background === 'rgb(255, 254, 240)' ? 'black' : 'rgb(255, 254, 240)'
document.querySelector('body').style.color = document.querySelector('body').style.color ===
	'black' ? 'white' : 'black'
}
# 6.4 页眉 (版本:0.9)
既然采用了naive-ui框架,那本着不重复造轮子的心态,打算直接采用……嗯?
naive-ui没有提供页眉或者顶部导航栏?
只提供了侧边导航栏,这个与期待不太一样。
那就只能动手自己做一个,虽然内容本身也不多
# 6.4.1 组件结构
<!-- header.vue -->
<div class="headerNav">
	<div class="navContainer">
        <!-- 个人logo -->
		<div class="logo">
			<img src="../assets/Logo.png">
		</div>
         <!-- 导航栏右侧内容 -->
		<div class="navRight">
			<n-button style="margin-right: 20px;" text v-if="isdark" @click="themechange()">浅色?</n-button>
			<n-button style="margin-right: 20px;" text v-if="!isdark" @click="themechange()">深色?</n-button>
			<a target="_blank"
				href="https://eve-wings.github.io/Eve-Wings/guide/personal-works/%E7%A8%8B%E5%BA%8F/%E5%B7%A5%E4%BD%9C%E6%B8%85%E5%8D%95/#_0-%E5%89%8D%E8%A8%80">
				<n-icon size="25">
					<svg xmlns="http://www.w3.org/2000/svg" xmlns:xlink="http://www.w3.org/1999/xlink"
						viewBox="0 0 496 512">
                          <!-- 太长了所以svg内容略微省略了 -->
						<path fill="currentColor"></path>
					</svg>
				</n-icon>
			</a>
		</div>
	</div>
</div>
# 6.4.2 样式
Logo的图片,是导入来自个人github的logo,然后再使用滤镜进行反色以适应暗色背景
.headerNav {
  width: 100%;
  position: relative;
  top: 0;
  left: 0;
  min-height: 50px;
  border-bottom: 2px solid #bbb;
  color: inherit;
  background: inherit;
  transition: all 1s;

  .navContainer {
    width: 85%;
    margin: 0 auto;
    padding: 0 15px;
    // 使用弹性盒进行布局
    display: flex;
    align-items: center;

    .logo {
      height: 60px;
      display: flex;

      img {
        transition: all 1s;
        max-height: 60px;
        // 反色滤镜
        filter: invert();
      }
    }

    .navRight {
      display: flex;
      margin-left: auto;
      margin-right: 5px;

      a {
        color: #aaa;

        &:hover {
          color: #363636
        }
      }
    }
  }
}
# 6.5 创建新分类 (版本:0.9)
# 6.5.1 主体 main
<headerNav></headerNav>
<div id="main">
    <!-- transition 为过度做准备 -->
    <transition name="Slide-left"  mode="out-in"></transition>
</div>
// 主体内容,左右两侧适当留空,以便添加其他的内容
// 当且尚未进行移动端适配
#main{
  width: 70%;
  margin: 20px auto;
}
# 6.5.2 卡片card
使用naive-ui提供的card卡片组件作为容器,先写没有内容的情况
<!-- 这个卡片将在没有任何分类的时候显示 -->
<n-card title="你尚未添加任何的分类,请您添加分类" id="NoList">
	<template #header-extra>
         <!-- 这里使用的是naive-ui提供的卡片的插槽功能 -->
		<n-button circle style="font-size: 1.5rem;" @click="showClassForm">+</n-button>
	</template>
</n-card>
# 6.5.3 遮罩层
我们需要通过这个按钮,弹出“新建分类”的面板,同时需要遮罩层
<!-- 遮罩层 -->
<div id="shadow" v-if="isShadow"></div>
// 遮罩层样式
#shadow {
  width: 100%;
  height: 100%;
  position: absolute;
  left: 0;
  top: 0;
  z-index: 998;
  background-color: rgba(0, 0, 0, 0.7);
}
// 在data中添加数据
isShadow: false
// 为按钮绑定事件,用来测试遮罩层的情况
createClass () {
    this.isShadow = !this.isShadow
}
可以正常显示遮罩层,但是直接添加还是有点突兀,我们给它添加动画
<transition name="fade-display">
	<div id="shadow" v-if="isShadow"></div>
</transition>
# 6.5.4 添加新分类表单
<transition name="Slide-bottom">
	<div id="createClassForm" v-if="isCreateClass">
		<n-card title="创建新的分类">
			<template #header-extra>
				<!-- 取消按钮 -->
				<n-button circle @click="isCreateClass=false;isShadow=false">X</n-button>
			</template>
			<n-form :model="createClassForm" ref="createClassFormRef">
				<n-form-item label="分类名">
					<n-input v-model:value="createClassForm.label"></n-input>
				</n-form-item>
				<n-form-item>
					<!-- 提交按钮 -->
					<n-button style="margin-left: auto;" @click="pushClass()" :disabled="createClassForm.label === ''">
						创建</n-button>
				</n-form-item>
			</n-form>
		</n-card>
	</div>
</transition>
样式:
// 表单样式
#createClassForm {
  border-radius: 3px;
  width: 45%;
  position: absolute;
  left: 28%;
  top: 25%;
  z-index: 999;
  box-shadow: darken(@lightGreen, 10%) 0px 0px 15px;
}
# 6.5.5 按钮绑定事件:
pushClass() {
	let label = this.createClassForm.label
    // 通过类创建实例对象
	let classification = new Classification(label)
    // 更改store数据
	this.$store.commit('pushClassification', classification)
    // 表单初始化
	this.createClassForm.label = ''
	this.isShadow = !this.isShadow
	this.isCreateClass = !this.isCreateClass
}
当分类被创建之后,是事项列表中的分类长度也不为零,不能再提示没有分类了
<!-- 当事项列表中没有任何事项时 -->
<!-- 在这里因为一开始v-if没有写在div上导致动画效果出不来……太蠢了 -->
<transition name="Slide-left" mode="out-in">
	<div v-if="$store.state.mattersList.classifications.length === 0">
		<n-card title="你尚未添加任何的分类,请您添加分类">
			<template #header-extra>
				<n-button circle style="font-size: 1.5rem;" @click="showClassForm()">+</n-button>
			</template>
		</n-card>
	</div>

	<!-- 当事项列表中有事项时 -->
	<div v-if="$store.state.mattersList.classifications.length !== 0">
		<n-card>
			<n-card v-for="(classification, classIndex) in $store.state.mattersList.classifications" :key="classIndex"
				class="classification">
				<n-collapse>
					<n-collapse-item :title="classification.label" :name="classIndex">
						<!-- 代办事项相关 -->
					</n-collapse-item>
					<!-- 用于修改分类的内容 -->
					<div class="classEditBtns">
						<n-button type="info" style="margin-right: 20px;" @click="showCreateMatterForm(classIndex)">+
							添加事项
						</n-button>
						<n-button type="warning" style="margin-right: 20px;" @click="showEditClassForm(classIndex)">编辑
						</n-button>
						<n-button type="error" @click="removeClass(classIndex)">删除</n-button>
					</div>
				</n-collapse>
			</n-card>
			<n-card title="创建新的分类" style="margin-top: 30px;">
				<template #header-extra>
					<n-button circle style="font-size: 1.5rem;" @click="showClassForm()">+</n-button>
				</template>
			</n-card>
		</n-card>
	</div>
</transition>
# 6.6 展示代办事项列表 (版本:0.9)
# 6.6.1 Collapse 折叠面板组件
<!-- 展示待办事项列表 -->
<transition name="Slide-left">
	<div v-if="$store.state.mattersList.classifications.length !== 0">
		<n-card>
			<n-card v-for="(classification, classIndex) in $store.state.mattersList.classifications" :key="classIndex"
				class="classification">
				<n-collapse>
					<n-collapse-item :title="classification.label" :name="classIndex">
						<!-- 代办事项相关 -->
					</n-collapse-item>
					<!-- 用于修改分类的内容 -->
					<div class="classEditBtns">
						<n-button type="info" style="margin-right: 20px;" @click="showCreateMatterForm(classIndex)">+
							添加事项
						</n-button>
						<n-button type="warning" style="margin-right: 20px;" @click="showEditClassForm(classIndex)">编辑
						</n-button>
						<n-button type="error" @click="removeClass(classIndex)">删除</n-button>
					</div>
				</n-collapse>
			</n-card>
			<n-card title="创建新的分类" style="margin-top: 30px;">
				<template #header-extra>
					<n-button circle style="font-size: 1.5rem;" @click="showClassForm()">+</n-button>
				</template>
			</n-card>
		</n-card>
	</div>

    <!-- 省略 -->
</transition>

<!-- 编辑分类名 -->
<transition name="Slide-bottom">
	<div id="editClassForm" v-if="isEditClass">
		<n-card title="修改分类名">
			<template #header-extra>
				<n-button circle @click="isEditClass=false;isShadow=false">X</n-button>
			</template>
			<n-form :model="editClassForm">
				<n-form-item label="分类名">
					<n-input v-model:value="editClassForm.label"></n-input>
				</n-form-item>
				<n-form-item>
					<n-button style="margin-left: auto;" @click="editClass()" :disabled="editClassForm.label === ''">修改
					</n-button>
				</n-form-item>
			</n-form>
		</n-card>
	</div>
</transition>
# 6.6.2 按钮绑定的事件
// 修改分类
showEditClassForm(index) {
	this.editClassForm.index = index
	this.editClassForm.label = this.$store.state.mattersList.classifications[index].label
	this.isShadow = !this.isShadow
	this.isEditClass = !this.isEditClass
},
    // 实际上写到这里想起,在vuex中,mutations中的方法,是不能传递两个以上的参数的
    // 知识点不牢固……回去重新修改mutations中的方法
editClass() {
	this.$store.commit('editClassification', this.editClassForm)
	this.editClassForm = {
		index: -1,
		label: ''
	}
	this.isShadow = !this.isShadow
	this.isEditClass = !this.isEditClass
	this.saveLocal()
},
# 6.7 添加事项 (版本:0.9)
# 6.7.1 按钮与表单
在分类上添加新的按钮,添加事项
<div class="classEditBtns">
	<n-button type="info" style="margin-right: 20px;" @click="showCreateMatterForm(classIndex)">+ 添加事项</n-button>
	<n-button type="warning" style="margin-right: 20px;" @click="showEditClassForm(classIndex)">编辑</n-button>
	<n-button type="error" @click="removeClass(classIndex)">删除</n-button>
</div>
同时还有添加事项的表单
<transition name="Slide-bottom">
	<div id="createMatterForm" v-if="isCreateMatter">
		<n-card title="添加事项">
			<template #header-extra>
				<n-button circle @click="isCreateMatter=false;isShadow=false">X</n-button>
			</template>
			<n-form :model="createMatterForm">
				<n-form-item label="事项名" show-require-mark>
					<n-input v-model:value="createMatterForm.label" placeholder="请输入事项名——比如,我想吃白切鸡?" maxlength="20"
						show-count clearable></n-input>
				</n-form-item>
                 <!-- 使用栅格系统 -->
				<n-grid x-gap="12" :cols="2">
					<n-grid-item>
						<n-form-item label="优先级">
							<n-rate v-model:value="createMatterForm.priority" />
						</n-form-item>
					</n-grid-item>
					<n-grid-item>
						<n-form-item label="拟定完成时间">
							<n-date-picker v-model:value="createMatterForm.completionTime" type="date" clearable>
							</n-date-picker>
						</n-form-item>
					</n-grid-item>
				</n-grid>
				<n-form-item label="描述">
					<n-input type="textarea" maxlength="100" show-count v-model:value="createMatterForm.describe"
						placeholder="不妨描述一下事项?当然,在这里不写任何东西也不会有任何影响,实际上,烤全鸡也不错"></n-input>
				</n-form-item>
				<n-form-item>
					<n-button style="margin-left: auto;" @click="pushMatter()"
						:disabled="createMatterForm.label === ''">添加事项</n-button>
				</n-form-item>
			</n-form>
		</n-card>
	</div>
</transition>
# 6.7.2 数据
我们需要获得当天的时间,因此在页面加载的时候,通过created钩子,获取当天时间
created() {
	this.today = new Date().setHours(0, 0, 0, 0)
}
表单的数据如下:
createMatterForm: {
	classIndex: -1,
	label: '',
	describe: '',
	completionTime: this.today,
	priority: 0
}
# 6.7.3按钮绑定的事件:
// 添加事项
	showCreateMatterForm(index) {
         // 显示遮罩层和表单
		this.isShadow = !this.isShadow
		this.isCreateMatter = !this.isCreateMatter
         // 同时获取所处分类的索引值
		this.createMatterForm.classIndex = index
	},
	pushMatter() {
		let createTime = new Date().setHours(0, 0, 0, 0)
		let cMF = this.createMatterForm
         // 实例化对象
		let matter = new Matter(cMF.classIndex, cMF.label, cMF.describe, createTime, cMF.completionTime,
			cMF.priority)
         // 修改数据
		this.$store.commit('pushMatter', matter)
         // 遮罩层和表单关闭
		this.isShadow = !this.isShadow
		this.isCreateMatter = !this.isCreateMatter
         // 初始化
		this.createMatterForm = {
			classIndex: -1,
			label: '',
			describe: '',
			completionTime: this.today,
			priority: 0
		}
	}
# 6.8 展示事项 (版本:0.9)
在分类的基础上,通过v-for循环遍历classifications中的matters,从而获取所有的待办事项,并且进行展示
<n-collapse-item :title="classification.label" :name="classIndex">
	<!-- 代办事项相关 -->
	<n-card v-for="(matter, matterIndex) in classification.matters" :key="matterIndex" class="matter"
		:class="{compMatter:matter.completion}" :title="matter.label">
		<!-- 待办事项操作相关 -->
		<template #header-extra>
			<div style="margin-right: 20px">
				<n-switch :default-value="matter.completion" @update:value="matterComplet(classIndex, matterIndex)"
					size="small" />
			</div>
			<div style="margin-right: 20px">
				<n-rate size="small" :value="matter.priority" />
			</div>
			<div>
				<n-button type="info" style="margin-right: 20px;"
					@click="showCreateMatterSonForm(classIndex, matterIndex)">+ 添加子事项
				</n-button>
				<n-button type="warning" style="margin-right: 20px;" @click="showEditMatter(matterIndex,matter)">编辑
				</n-button>
				<n-button type="error" @click="removeMatter(classIndex, matterIndex)">删除
				</n-button>
			</div>
		</template>
		<span v-if="matter.describe !== '' ">描述: {{matter.describe}}</span>
		<n-collapse>
			<n-collapse-item title="查看子事项" :name="matterIndex" v-if="matter.matterSons.length !== 0">
				<!-- 代办子事项相关 -->
			</n-collapse-item>
		</n-collapse>
	</n-card>
	<!-- 代办事项结束 -->
</n-collapse-item>
同时我们需要绑定四个事件,分别是:事项完成情况的修改(switch开关组件)、删除待办事项、编辑代办事项、以及添加子事项
# 6.8.1 事项完成情况修改
removeMatter(classIndex, matterIndex) {
	let removeMatterForm = {
		classIndex: classIndex,
		matterIndex: matterIndex
	}
	this.$store.commit('removeMatter', removeMatterForm)
}

// store/index.js
complateMatter(state, matter) {
	let classIndex = matter.classIndex
	let matterIndex = matter.matterIndex
	let comp = state.mattersList.classifications[classIndex].matters[matterIndex].completion
	if (comp === true) {
		state.mattersList.classifications[classIndex].matters[matterIndex].completion = false
	} else {
        state.mattersList.classifications[classIndex].matters[matterIndex].completion = true
	}
}
# 6.8.2 删除待办事项
removeMatter(classIndex, matterIndex) {
	let removeMatterForm = {
		classIndex: classIndex,
		matterIndex: matterIndex
	}
	this.$store.commit('removeMatter', removeMatterForm)
}
# 6.8.3 编辑代办事项
需要获取到待办事项的详细信息,并且将其在编辑表单中展示出来
showEditMatter(matterIndex, matter) {
	this.isShadow = !this.isShadow
	this.isEditMatter = !this.isEditMatter
	this.editMatterForm.classIndex = matter.classIndex
	this.editMatterForm.matterIndex = matterIndex
	this.editMatterForm.label = matter.label
	this.editMatterForm.describe = matter.describe
	this.editMatterForm.completionTime = matter.completionTime
	this.editMatterForm.completion = matter.completion
	this.editMatterForm.priority = matter.priority
}
表单:
<transition name="Slide-bottom">
	<div id="editMatterForm" v-if="isEditMatter">
		<n-card title="编辑事项">
			<template #header-extra>
				<n-button circle @click="isEditMatter=false;isShadow=false">X</n-button>
			</template>
			<n-form :model="editMatterForm">
				<n-form-item label="事项名" show-require-mark>
					<n-input v-model:value="editMatterForm.label" placeholder="请输入事项名" maxlength="20" show-count
						clearable></n-input>
				</n-form-item>
				<n-grid x-gap="12" :cols="2">
					<n-grid-item>
						<n-form-item label="优先级">
							<n-rate v-model:value="editMatterForm.priority" />
						</n-form-item>
					</n-grid-item>
					<n-grid-item>
						<n-form-item label="拟定完成时间">
							<n-date-picker v-model:value="editMatterForm.completionTime" type="date" clearable>
							</n-date-picker>
						</n-form-item>
					</n-grid-item>
				</n-grid>
				<n-form-item label="描述">
					<n-input type="textarea" maxlength="100" show-count v-model:value="editMatterForm.describe">
					</n-input>
				</n-form-item>
				<n-form-item>
					<n-button style="margin-left: auto;" @click="editMatter()" :disabled="editMatterForm.label === ''">
						修改事项</n-button>
				</n-form-item>
			</n-form>
		</n-card>
	</div>
</transition>
提交修改:
editMatter() {
	this.$store.commit('editMatter', this.editMatterForm)
	this.editMatterForm = {
		classIndex: -1,
		MatterIndex: -1,
		label: '',
		describe: '',
		completionTime: this.today,
		completion: false,
		priority: 0
	}
	this.isShadow = !this.isShadow
	this.isEditMatter = !this.isEditMatter
}
# 6.8.4 添加子事项
// 添加子事项
showCreateMatterSonForm(classIndex, matterIndex) {
		this.isShadow = !this.isShadow
		this.isCreateMatterSon = !this.isCreateMatterSon
		this.createMatterSonForm.classIndex = classIndex
		this.createMatterSonForm.matterIndex = matterIndex
	},
	pushMatterSon() {
		let createTime = new Date().setHours(0, 0, 0, 0)
		let cMSF = this.createMatterSonForm
		let matter_son = new Matter_son(cMSF.classIndex, cMSF.matterIndex, cMSF.label, cMSF.describe,
			createTime, cMSF.completionTime, cMSF.priority)
		this.$store.commit('pushMatterSon', matter_son)
		this.isShadow = !this.isShadow
		this.isCreateMatterSon = !this.isCreateMatterSon
		this.createMatterSonForm = {
			classIndex: -1,
			matterIndex: -1,
			label: '',
			describe: '',
			completionTime: this.today,
			priority: 0
		}
	}
# 6.9 子事项
布局基本上与事项一致,略过
# 6.10 本地缓存 (版本:0.9)
// 本地缓存
saveLocal() {
	// 对象JSON化
	let str = JSON.stringify(this.$store.state.mattersList)
	// 本地缓存
	localStorage.setItem('mattersList', str)
}
在created钩子中
// created()
let obj = localStorage.getItem('mattersList')
if (obj !== null) {
	let mattersList = JSON.parse(obj)
	this.$store.commit('getMattersList', mattersList)
}
在所有增删改的方法中,调用 saveLocal()
# 6.11 布局调整、内容细化 (版本:0.9)
# 6.11.1过渡动画
// 动画

// 淡入淡出
.fade-display-enter-active {
  opacity: 0;
  transition: all 1s;
}

.fade-display-enter-to {
  opacity: 1;
}

.fade-display-leave-active {
  transition: all 1s;
  opacity: 1;
}

.fade-display-leave-to {
  opacity: 0;
}

// 从下往上滑入、上往下滑出
.Slide-bottom-enter-active {
  opacity: 0;
  transform: translateY(40px);
  transition: all 1s;
}

.Slide-bottom-enter-to {
  opacity: 1;
  transform: translateY(0);
}

.Slide-bottom-leave-active {
  transition: all 1s;
}

.Slide-bottom-leave-to {
  opacity: 0;
  transform: translateY(40px);
}

// 从左往右滑入、从右往左滑出
.Slide-left-enter-active {
  opacity: 0;
  transform: translateX(-80px);
  transition: all 1s;
}

.Slide-left-enter-to {
  opacity: 1;
  transform: translateX(0);
}

.Slide-left-leave-active {
  opacity: 1;
  transform: translateX(0);
  transition: all 1s;
}

.Slide-left-leave-to {
  opacity: 0;
  transform: translateX(-80px);
}
# 6.11.2时钟组件
<template>
	<div class="clock">
		<transition name="clock-open">
			<div v-if="timeMessage">
				<n-card>
					<n-gradient-text size="22" type="danger">已经{{time.getHours()}}点了哦</n-gradient-text>
				</n-card>
			</div>
		</transition>
		<transition name="clock-open" >
			<div v-if="isOpenClock">
				<n-card title="我的天啊,你都看看几点了" closable @close="openClock()"
					:segmented="{content: 'hard'}">
					<div style=" text-align: center; font-size: 16px;">
						<n-gradient-text :size="24" type="success"><n-time :time="time" type="datetime " format="yyyy-MM-dd HH:mm:ss" /></n-gradient-text>
					</div>
				</n-card>
			</div>
		</transition>
		<n-button text @click="openClock()">
			<n-gradient-text :size="16" type="success"><n-time :time="time" type="datetime " format="yyyy-MM-dd HH:mm:ss" /></n-gradient-text>
		</n-button>
	</div>
</template>

<script>
	import '../assets/css/clock.css'
	import {
		NCard,
		NButton,
		NTime,
		NGradientText
	} from 'naive-ui'
	export default {
		name: 'clock',
		components: {
			NCard,
			NButton,
			NTime,
			NGradientText
		},
		data() {
			return {
				time: '',
				isOpenClock: false,
				timeMessage: false,
			}
		},
		methods: {
			openClock() {
				this.isOpenClock = !this.isOpenClock
			}
		},
		created() {
			this.time = new Date()
			setInterval(() => {
				this.time = new Date()
				if(this.time.getMinutes() === 0 && this.time.getSeconds() === 0){
					this.timeMessage = true
					setTimeout(() => {
						this.timeMessage = false
					},5000)
				}
			}, 500)
		}
	}
</script>
.clock {
  position: fixed;
  bottom: 0;
  left: 0;
}

// 时钟打开
.clock-open-enter-active {
  opacity: 0;
  transform: translateY(-300px);
  transition: all 1s;
}

.clock-open-enter-to {
  opacity: 1;
  transform: translateY(0);
}

.clock-open-leave-active {
  transition: all 1s;
}

.clock-open-leave-to {
  opacity: 0;
  transform: translateY(-300px);
}
# 6.12 后续更新维护(2021/07/14)
# 6.12.1 回车键触发提交(0.95版本)
实际上使用的是vue提供的 @keyup.enter 绑定事件
绑定的事件可以在代码中搜索 keyup 关键字
# 6.12.2 移动端适配(0.95版本)
使用媒体监听基于原本的样式再整了一套移动端的样式
@meadia screen and (max-width: 768px){}
# 6.12.3 变量名调整(0.95版本)
matter_son 统一改为 matterSon
# 6.12.4 bug修复——移动端下,输入框无法看到其输入的文本(2021/07/07)
修改样式,媒体查询移动端
@media screen and (max-width:768px) {
    .n-input{
    background-color: rgba(170, 170, 170, 0.5);
    .n-input-wrapper{
      .n-input__input{
        .n-input__input-el{
          color: darken(@lightGreen, 10%)
        }
      }
      .n-input__textarea{
        .n-input__textarea-el{
          color: darken(@lightGreen, 10%)
        }
      }
    }
  }
}
# 6.12.5 代码优化(2021/07/08)
const matterSon = state.mattersList.classifications[classIndex].matters[matterIndex].matterSons[matterSonIndex]
// 通过这种方式获取到对象之后,对matterSon操作即可,可以提高可读性
# 6.12.6 输入框输入空格的问题(2021/07/08)
str.trim() // 可以删除字符串中的前后空格串,返回新数组
# 6.12.7 删除分类、事项修改(2021/07/14)
removeClassification(state, classIndex) {
	state.mattersList.classifications.splice(classIndex, 1)
	// 将分类之后的分类中所有的classID进行修改
	state.mattersList.classifications.forEach((classification, classIndex) => {
		classification.matters.forEach(matter => {
			matter.classIndex = classIndex
			matter.matterSons.forEach(matterSon => {
				matterSon.classIndex = classIndex
			})
		})
	})
}

removeMatter(state, removeMatterForm) {
	// classIndex, matterIndex
	let classIndex = removeMatterForm.classIndex
	let matterIndex = removeMatterForm
	const matters = state.mattersList.classifications[classIndex].matters
	matters.splice(matterIndex, 1)
	// 删除待办事项之后,对该事项之后的事项的ID进行修改
	matters.forEach((matter, matterIndex) => {
		matter.matterSons.forEach(matterSon => {
			matterSon.matterIndex = matterIndex
		})
	})
}
# 6.13 项目感想
这里开始不正经了
- 我原本是想着画那个么线框图之类的,但实际上我发现是我天真了……虽然有一定的美术基础,但是就那么几十分钟画的玩意加上又不是学设计的,线框图基本上就没有好好遵守,因为画的太差了……
- 所以导致移动端适配不是第一时间就进行开发
- 真的!一定要好好思考数据到底是怎么一个结构……
- 关于naive-ui :我对这个框架还是比较看好,虽然部分内容不太好用,但是整体来说美观且复用性良好,而且,官方的文档写的十分的有趣。